
Web scraping technology has been around for years. But methods and techniques of website creation and protection are evolving constantly. On many occasions websites are using frontend frameworks like Vuejs, React, or Angular, that load its content partially and asynchronously via javascript. As a result, such content can only be retrieved once the page is open in a web browser. Luckily, this is when Node.js comes to our aid.
This tutorial will illustrate a web scraping procedure with JavaScript and Node.js in detail. The objective is to render a static page and scrape the desired content. Then we will look into the Puppeteer functionalities (a headless browser) and examine how to retrieve data from a dynamic website that uses javascript to load content.
Brief summary of the article:
- Web browser
- Web page with desired data
- Visual Studio Code or similar code editor
- Node.js
- Axios
- Parser (JSdom or Cheerio)
- Puppeteer
Have everything covered? Let’s engage…
Summary of the article:
- Installing components
- How to scrape a simple website
- How to parse HTML
- How to scrape a dynamic website
- How to work with Puppeteer
- Resulting code snippet
- Additional functionalities
- Concluding statements
Installing components
Node.js
Node.js is a widely used JavaScript runtime environment. It includes numerous features that help to automate various aspects of websites data extraction.
Follow the instructions on this website to download and run Node.js on your system. Make sure that the Node Package Manager (or npm tool) is automatically installed as well. This package manager will aid significantly with integrating packages, used for web scraping quickly and safely.
Next step is to run the following command in your project’s root directory to create a package.json file, that contains project’s details:
npm initAxios
Axios, a reliable promise-based HTTP client, is used both in Node.js and the web browser. It allows you to make HTTP requests from Node.js with npm tool using promises, as well as obtain online data with ease.
Moreover, Axios is normally used to convert data into JSON file format and intercept requests and responses. It is also able to take care of multiple concurrent requests.
Install it by heading to your project’s directory folder in the terminal and running the following command:
npm install axiosAxios will be installed into a default folder, called node_modules. It will be created automatically in your project’s directory.
Cheerio vs. jsdom

Cheerio is a reliable and smooth tool that can be used to interact with web pages using a jQuery-like syntax. This technique simplifies viewing, selecting and modifying the page’s DOM elements quite significantly. Although you may parse and manipulate the DOM seamlessly with Cheerio, it is not an equivalent of a web browser. Cheerio is capable of scraping data swiftly, compared to other software since it doesn’t load external resources, execute JavaScript, produce a visual rendering or apply CSS.
Jsdom is a broadly applied DOMParser interface, which is another opportune option to work with. Specialists tend to use it for more complex data structures.
But we have chosen to use Cheerio for this guide. Go to the project’s location in the terminal, and install Cheerio by executing this command:
npm install cheerioJust like with Axios, npm will install Cheerio to a default folder named node_modules, which will be created automatically in your project’s directory.
Puppeteer
We suggest you install Puppeteer along with other software, although we will need it a bit further in our tutorial, notably once we focus on dealing with dynamic websites.
Generally speaking, it is a Node library that can be used to control and configure the work of a headless Chrome browser, as well as to simplify and speed up data collection.
It is no secret that content on certain websites is loaded with the help of JavaScript. Therefore, usage of HTTP-based solutions, for instance the above-mentioned Axios, may not be as beneficial as some would expect. Puppeteer allows users to replicate the browser environment, executing JavaScript like a browser would, and in such a way, to scrape dynamic websites for necessary data.
Similarly to installing other packages, go to the project’s location in the terminal, and install Puppeteer by executing the following command:
npm install puppeteerHow to scrape a simple website
We will now illustrate how to use Axios and Cheerio to retrieve data from a simple website.
We have chosen this web page for our demonstration. Our goal is to extract information about opening hours and telephone numbers of pool services in Florida on a Google Maps page.
We need to use the inspector tool on the web browser in order to find the HTML elements containing the required information:
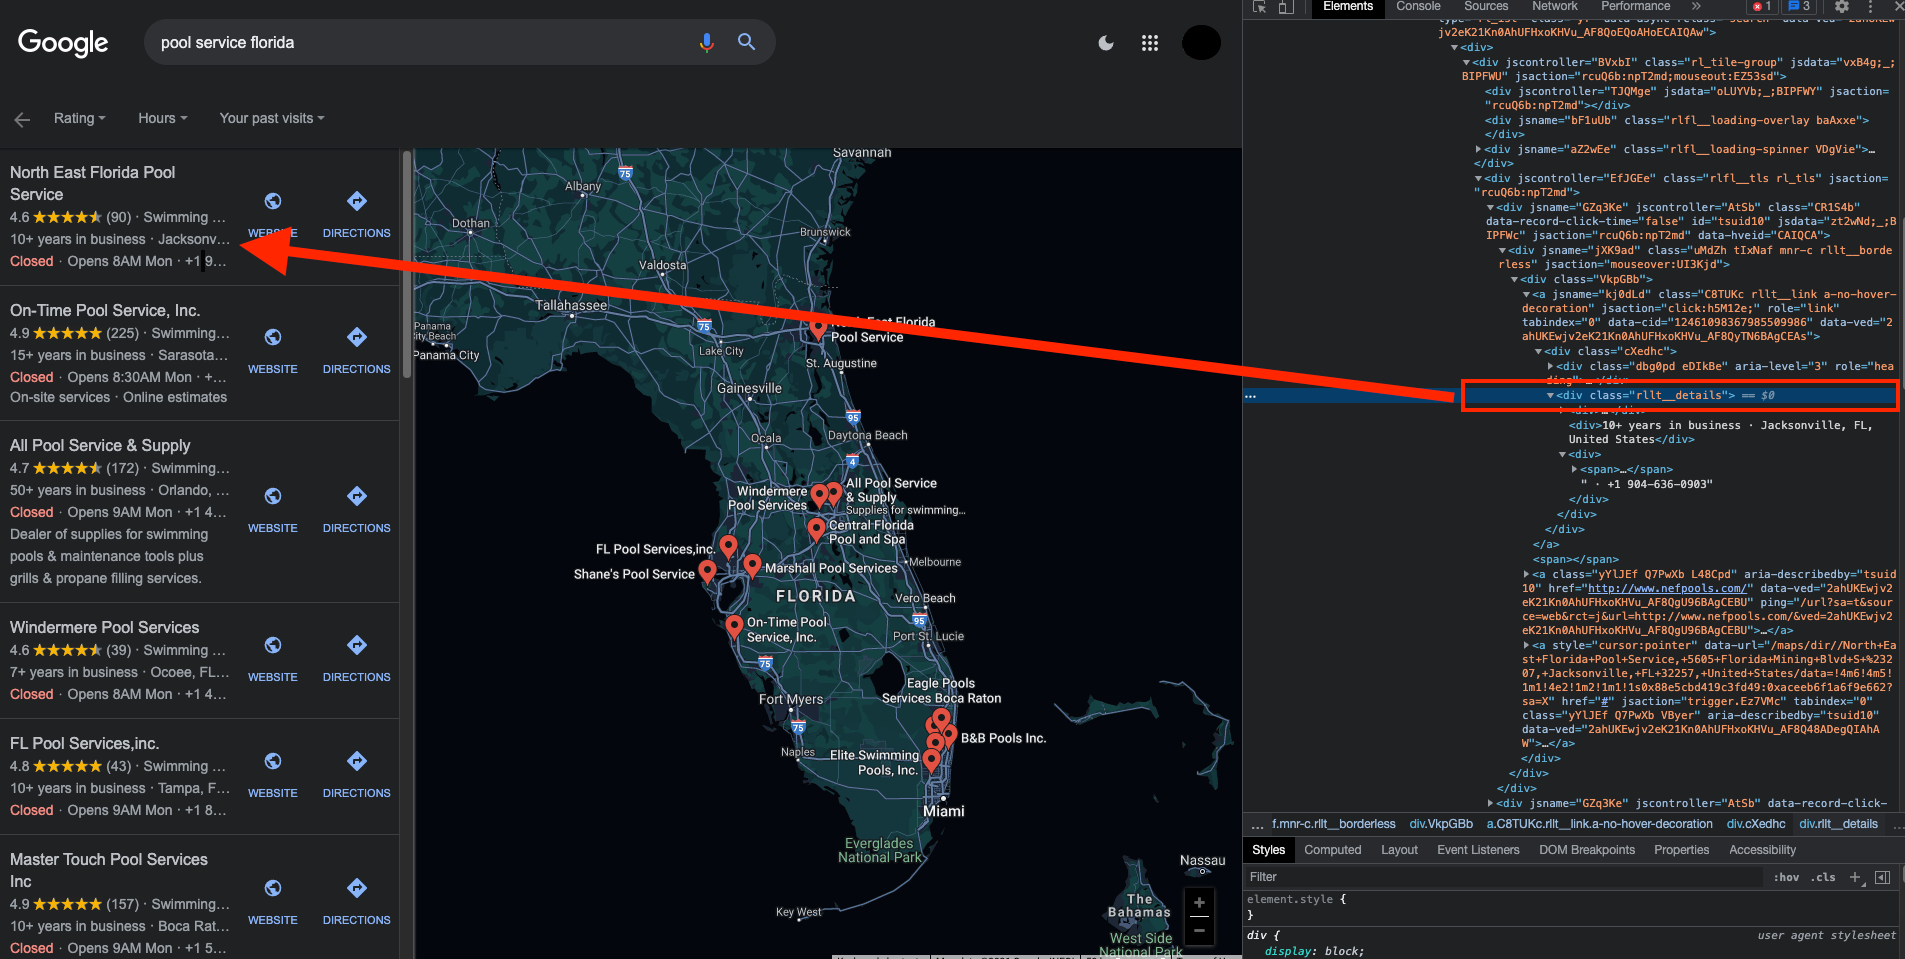
In the screenshot, you can see that the information is contained in a tag with a class named "rllt__details".
The scraping logic should be created as described below:
Step 1. Create a file called index.js, where the programming logic for data extraction from the corresponding web page will be contained.
Step 2. Use the require function in order to include the components, used in this project. This function is one of the Node.js features.
const axios = require('axios');
const cheerio = require('cheerio');
Step 3. Run the following code to make a GET HTTP request to the RocketScrape with the help of Axios:
const config = {
  method: 'get',
  url: 'https://api.rocketscrape.com?apiKey={{YOUR_API_KEY}}&url=https://www.google.com/search?q=pool service florida&biw=1920&bih=976&sz=0&tbm=lcl',
  headers: { }
};

axios(config).then(response => {
  const html = response.data;
})
Keep in mind that whenever the web page receives a request, it generates a response. This Axios response object is a combination of numerous properties, one of them being the data referring to the payload returned from the server.
Therefore, once a GET request is made, the data we seek can be gained from the response, delivered in HTML format.
How to parse HTML
Step 4. Load data, obtained with the responses, into a Cheerio instance. In such a way, a Cheerio object will be created. It can be used to parse the HTML from the target web page and locate the DOM elements for the information we seek (similarly to using jQuery).
For convenience, the said Cheerio object will be referred to as $, similarly to jQuery convention.
To do so, use the following code:
const $ = cheerio.load(html);Step 5. Execute this code to locate the elements, that contain our required data using the Cheerio’s selectors syntax
$('.rllt__details').each((index, element) => {
  console.log('pool service----->', $(element, html).children("div").last().text())
})
Take note, that in order to receive data in a text format you will have to use the text() method, as illustrated above. Step 6. Make sure that any errors you might encounter while scraping are logged.
.catch( error => {
   console.log(error);
});
Take a look at the whole code snippet to use for successful scraping:
const axios = require('axios');
const cheerio = require('cheerio');
//performing a GET request
const config = {
method: 'get',
url: 'https://api.rocketscrape.com?apiKey={{YOUR_API_KEY}}&url=https://www.google.com/search?q=pool service florida&biw=1920&bih=976&sz=0&tbm=lcl',
headers: { }
};
axios(config)
.then(response => {
//handling the success
const html = response.data;
//loading response data into a Cheerio instance
const $ = cheerio.load(html);
//selecting the elements with the data
$('.rllt__details').each((index, element) => {
//outputting the scraped data
console.log('pool service----->', $(element, html).children("div").last().text())
})
})
.catch( error => {
console.log(error);
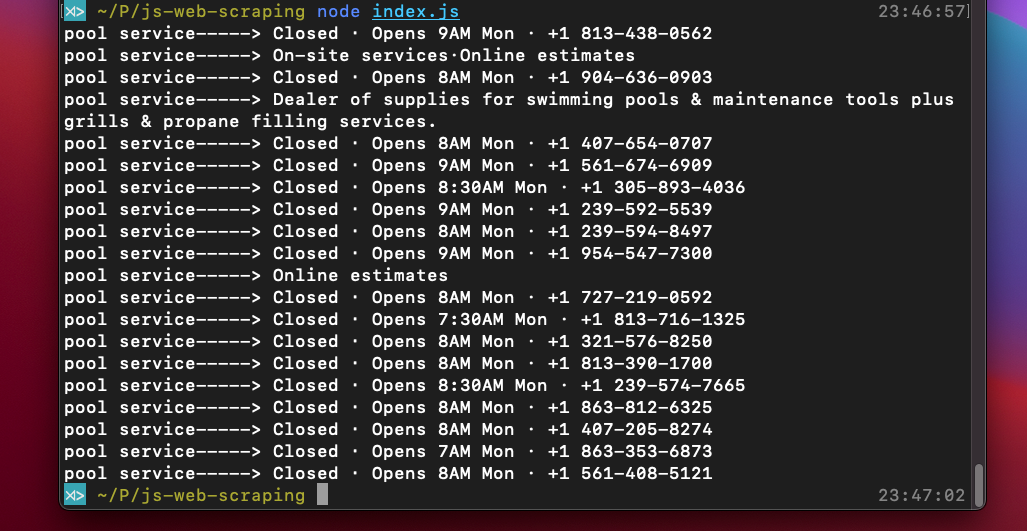
});To obtain the information subject to scraping from the web page, execute the complete code with the node index.js command. The following screenshot shows what your result should look like:
How to scrape a dynamic website
See the following instructions to successfully scrape a dynamic website for content.
async/await
We suggest that you follow our example and use the ES2017 asynchronous async/await syntax to optimize working with promises. With ES2017 released, principles of asynchronous code started to resemble the methods of synchronous code.
The difference between an async expression and an await expression is that in the first case a promise will always be returned. And in the latter case the remaining code cannot be executed by JavaScript, until that promise is resolved. In this way, the async/await guarantees that the webpage scraping will not be initiated before the page is fully loaded.
This can be illustrated in practice on the example of an Amazon page , which renders web content by means of JavaScript. Our current goal consists in scraping the page for the headings and relevant descriptions.
We need to use the inspector tool on the web browser in order to find the HTML elements containing the required information:
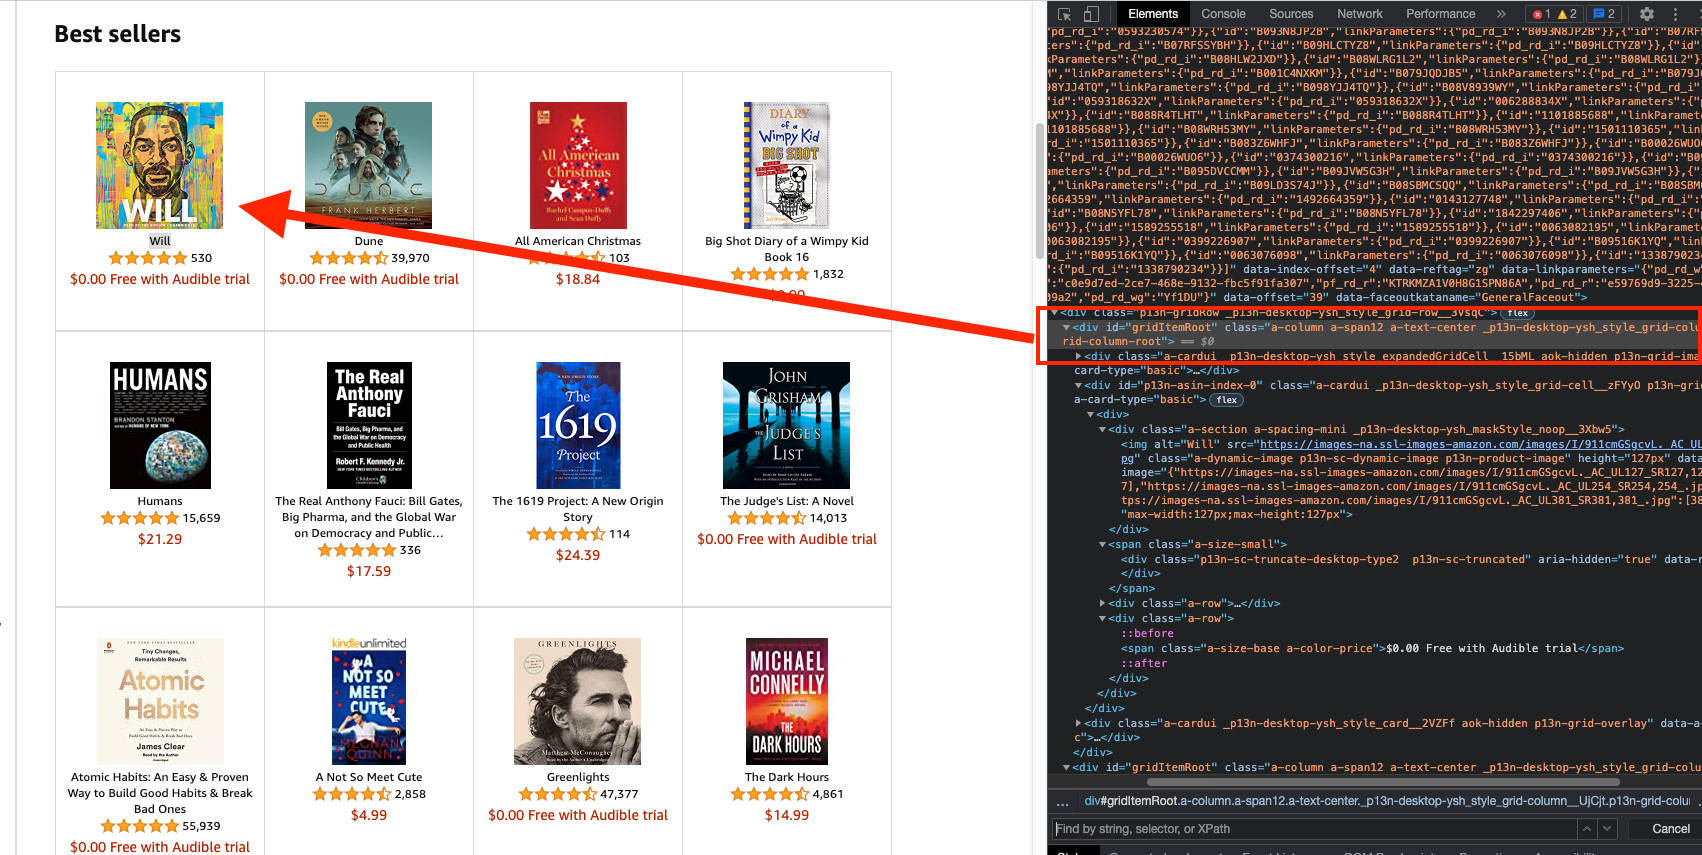
It can be seen on the screenshot, that every book is contained within a "_p13n-desktop-ysh_style_grid-column__UjCjt" class, amongst other things. Pay close attention to the fact that each book title is enclosed in a "p13n-sc-truncated" class and each price - in a "_p13n-desktop-ysh_price_p13n-sc-price__3mJ9Z" class accordingly. This information is important for properly selecting elements that will be subject to scraping later.
How to work with Puppeteer
The first thing to do is to create an index.js file. It will contain the programming logic for the desired data extraction from the webpage.
Next step is to integrate Puppeteer with our project by using the require function, a built-in Node.js component.
const puppeteer = require ('puppeteer');Now we’re all set for launching Puppeteer. By executing the following command you can launch an instance of the Chrome browser and navigate to the target webpage.
puppeteer.launch()Let’s also create a new page in the headless browser. Remember that we’re working with the await expression, which means we have to wait for the said page to be loaded prior to saving it to the page variable.
Now open the Amazon page in the newly created web page. Likewise, the code execution is supposed to be postponed until the page is fully loaded, since we’re using await. If not, you will see an error message.
It is recommended to wait for the page’s body tag to become fully visible before executing the remaining code. See the relevant example below:
.then(async browser => {
  const page = await browser.newPage ();
  await page.goto ('https://api.rocketscrape.com?apiKey={{YOUR_API_KEY}}&url=https://www.amazon.com/b?node=283155');
  await page.waitForSelector ('body');
}
After we have successfully opened our target web page (Anazon in the example) within Puppeteer, we may interact with it using an evaluate() function.
This function allows to manipulate of web pages and extract their contents by means of JavaScript built-in functions in Chrome, for instance querySelector().
See the code below:
const grabBooks = await page.evaluate(() => {
	let allBooks = document.body.querySelectorAll('._p13n-desktop-ysh_style_grid-column__UjCjt');

	// storing items in an array then selecting for retrieving content
  	scrapeItems = [];
    allBooks.forEach(item => {
        const bookName = item.querySelector('.p13n-sc-truncated');
        const bookPrice = item.querySelector('._p13n-desktop-ysh_price_p13n-sc-price__3mJ9Z');
        scrapeItems.push({
            bookName: bookName ? bookName.innerText : null,
            bookPrice: bookPrice ? bookPrice.innerText : null,
        });
    });

    const items = {
        "amazonBooks": scrapeItems,
    };

    return items;
});
We may now close the browser with the following command:
await browser.close ();Don’t forget to log any errors you might have faced during the scraping process.
.catch (function (err) {
    console.error (err);
});
Resulting code snippet
const puppeteer = require('puppeteer');
// starting Puppeteer
puppeteer.launch().then(async browser => {
// opening a new page and navigating to Amazon
const page = await browser.newPage();
await page.goto('https://api.rocketscrape.com?apiKey={{YOUR_API_KEY}}&url=https://www.amazon.com/b?node=283155');
await page.waitForSelector('body');
// manipulating the page's content
let grabBooks = await page.evaluate(() => {
const allBooks = document.body.querySelectorAll('._p13n-desktop-ysh_style_grid-column__UjCjt');
//storing items in an array then selecting for retrieving content
scrapeItems = [];
allBooks.forEach(item => {
const bookName = item.querySelector('.p13n-sc-truncated');
const bookPrice = item.querySelector('._p13n-desktop-ysh_price_p13n-sc-price__3mJ9Z');
scrapeItems.push({
bookName: bookName ? bookName.innerText : null,
bookPrice: bookPrice ? bookPrice.innerText : null,
});
});
let items = {
"amazonBooks": scrapeItems,
};
return items;
});
// outputting the scraped data
console.log(grabBooks);
// closing the browser
await browser.close();
}).catch(function (err) {
console.error(err);
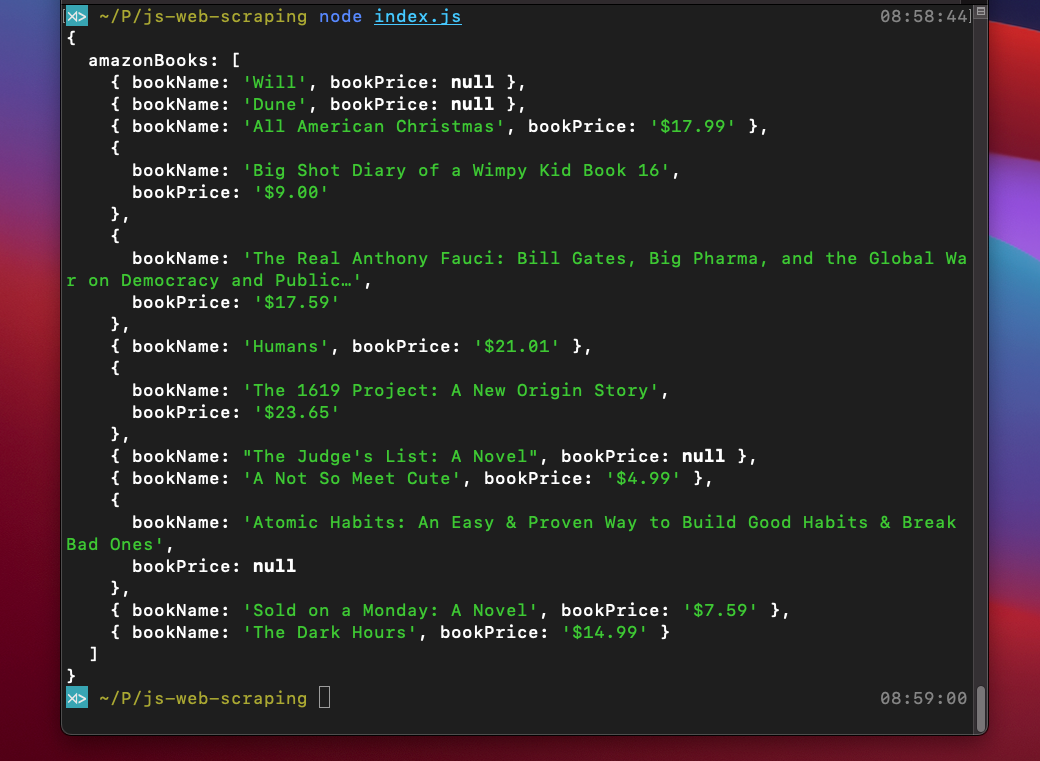
});We can now finally scrape the Amazon web page for the information we sought (or a similar web page of your choice). By executing the node index.js command you will obtain your data in this form:
Additional functionalities
Proxy service
If you intend to avoid various scraping restrictions and complications, while running your project at a larger scale of requests, you should consider connecting to a proxy service for setting up the IP addresses rotation after every few requests.
It will aid you immensely in protecting your scrapping efforts and retrieving the necessary content smoothly. We suggest you consider using residential proxies, in case you want to overcome the scraping obstacles and extract online data with ease and swiftness.
Luckily, all you have to do is launch a Puppeteer with one extra arguments line. And the proxy connection will be successfully established.
args: [ '--proxy-server=145.0.10.11:7866' ]Infinite Scroll
Sometimes you may notice an infinite scrolling function is available on a web page. Which means that the more scrolling towards the bottom you do, the more web page elements you may uncover. Here is how you can implement this feature into your code:
for (let j = 0; j < 5; j++) {
  await page.evaluate('window.scrollTo(0, document.body.scrollHeight)');
  await page.waitFor(1000);
}
Concluding statements
You have now completed the tutorial for web scraping with JavaScript and Node.js. We hope it has significantly boosted your research skills and made a beneficial impact on your project.
Never hesitate to check Axios, Cheerio, and Puppeteer documentation for additional advice and tips that might help you with more exquisite tasks. Remember, nothing is unachievable in the world of scraping.
Good luck!